If all or part of your baked image comes out black instead of showing your baked texture, there can be a few reasons this happens. Use the following checklist to troubleshoot your black bake results:
1. Flipped Normals
Faces have a front side and a back side. Only the front side shows textures during baking. This front side is the direction of the normal (the surface’s orientation toward a light source). Sometimes Blender doesn’t know which way the normal (front side) should face, so it gets flipped.
Check Face Orientation:
Overlays Menu -> Geometry -> Face Orientation
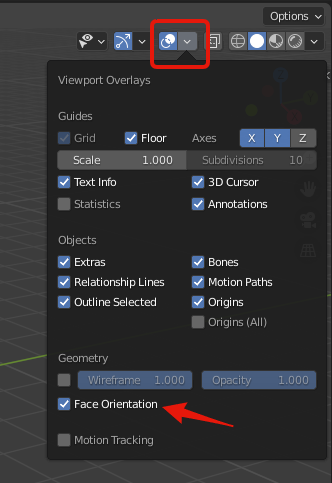
Faces should be blue (outward facing). If they are red, they are flipped.

Solutions:
In edit mode, use one of the following:
Select the red faces, press Alt+N, the choose Flip.
Shift+N flips all faces outward.
Shift+Ctrl+N flips all faces inward.
2. Hidden Objects or Geometry
Blender gives you the ability to hide objects or geometry, either individually or by collections. However, even if objects or geometry are hidden in your viewport, that does not mean it is hidden during rendering or baking. This can cause geometry overlapping during baking.
Objects/Geometry Hidden Individually
In both object and edit mode, use Alt+H to reveal any hidden objects or geometry.
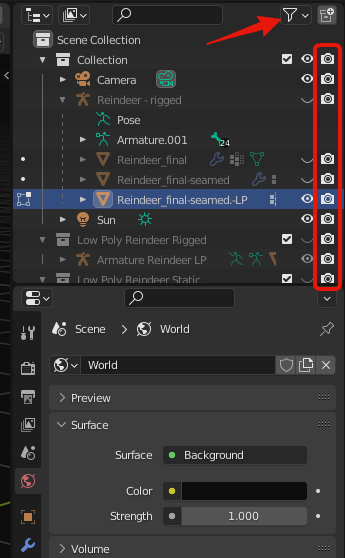
Objects Hidden by Collections
In the Outliner, check to see if there are any objects in a different collection that are hidden in the viewport only. This will be indicated by an open or shut eye icon.
Solutions:
In the Outliner:
Turn off the entire collection by unchecking the collection checkbox (this hides items in the collection from both viewport and rendering/baking).
Turning off the object from rendering:
In the filter (funnel icon) at the top of the Outliner, add the camera icon.
Click the camera icon for the object to disable it from rendering/baking.
3. Insufficient Lighting
Even though you can see your objects fine in the shading tab, in the materials preview mode, that does not indicate how much light is on your scene or objects. Rendering or baking depends entirely on the lighting in the scene.
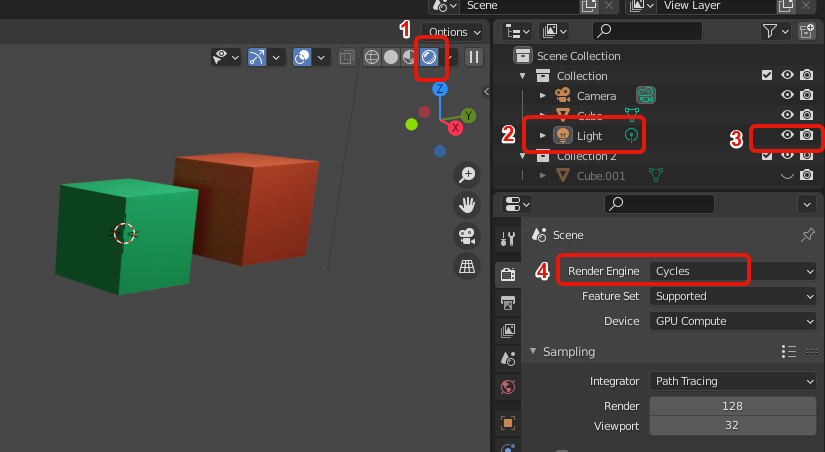
Check the Lighting (reference image below):
- Viewport Render (upper right menu) is dark?
No light in the scene, or light is hidden in viewport. This render is viewport only and does not affect baking. Use F12 (render from camera) instead to see the actual lighting. Also, see the items below. - Is there a light in your scene?
Check the Outliner to make sure you have at least one light (can also be an emission shader on a plane). - Is the light enabled for rendering/baking?
Check the Outliner to make sure the camera icon is white (not a dark outline). - Is the render engine set to cycles?
Under Render Properties, be sure the render engine is set to Cycles, not Eevee. This is especially important for emission shader lighting.
Reference Image:
4. Overlapping Geometry or Doubles
Sometimes we accidently create duplicate geometry that is not apparent at first glance, such as two faces sitting on top of each other, or duplicate vertices.
Check for Duplicate Vertices:
- Turn on X-ray mode (upper right menu, double box icon).
- In vertex selection mode, click a vertex. If some of the edges leading to the vertex are not highlighted, you have more than one vertex in that location.
- In edge selection mode, click an edge. If only part of the edge is highlighted, you may have an extra vertex on the edge, or more than one vertex in the same location at either end.
Solution:
Merge vertices (remove doubles) using the M key.
(USE WITH CAUTION, can undo sharp edges.)
- Go into edit mode.
- Select all vertices (A key).
(You can also circle select just the vertices you wish to merge.) - M for Merge -> by distance.
Check for Duplicate Faces:
- Turn on X-ray mode (upper right menu, double box icon).
- Check for dots along the edges. This indicates an extrude that was not moved, so there are hidden faces.
- Select a face and rotate around it, looking at the edges. You’ll see at least one edge that looks partially white and partially black. This is a sign of a duplicate face or vertex.
Solution:
Delete the face and redo if necessary. Merging vertices by distant may also work.
5. Overlapping UV Islands or Geometry
Sometimes we don’t unwrap our objects correctly and end up with overlapping islands and/or geometry. While this may not result in a black bake, it can create unexpected results in our bake, either with areas being much brighter or much darker than we expect.
Solution:
Go to your UV map editor and for each material assigned to your object:
- Highlight one material at a time and check to make sure nothing is overlapping.
- If islands are overlapping, you can move and resize the islands (or pack them).
- If geometry within an island is overlapping, use the UV Squares add-on to straighten up geometry, or fix manually.
6. At Least One Material Does Not Bake in a Multi-Material Bake Image
Many times you may wish to combine the baking or two or more materials into one image. We can do this by arranging our UV maps for each material on the shared image to leave space for the other(s).
However, sometimes we bake our materials to the “shared” image only to have one or more materials not bake, leaving a black space where the missing material should be.
Usually, the real issue isn’t that it did not bake, but that the missing material baked to a different image.. This can happen for a couple of reasons.
Solutions:
Check the name of the “bake-to” image.
For each material that is to share that image, they must all have the same “bake-to” image name.
Make sure the “bake-to” image node is highlighted for each material.
Sometimes we forget when we change an input texture, leaving the input texture node highlighted. Blender will think the highlighted node is the image to bake to rather than the one you intended. (This can cause you to lose your input texture if you save it after baking, so ALWAYS check it before baking and saving.)